Showing posts with label honey. Show all posts

Saturday, May 16, 2015

Pecan Pie Bites (No gluten, Low Sugar)

These are a fun version of pecan pie without all the calories. They only take 3 ingredients to make pecans, honey, and oil. pecans have a natural sweetness of their own so they don't need a lot of sweetener.  They will fill your mouth with a mouthful of yum. A great source of protein too. Read some of the benefits to pecans here. Pecans are loaded with nutritional benefits.

Ingredients

1 C chopped pecans
1 T coconut oil
1/2 T honey or vegan sweetener
1/2 C finely chopped pecans
1/4 C  chopped pecans

Directions     makes 8 bites

1. Put pecans in blender with oil and honey. Blend until smooth. I used the Blendtec twister jar that worked fast. It may require some pulse and stir in another blender until it reaches the right consistency.
2. Stir in the 1/2 C of pecans in a small bowl. Put in fridge until it starts to thicken about 30 to 60 minutes.
3. Take bowl out of fridge and roll into small balls. Roll into chopped nuts. Eat right away or put in fridge to harden. Store in airtight container.


Tuesday, May 12, 2015

Cashew Butter Bites (gluten free and low sugar)


This are a fast and easy healthy snack to make. I love having snacks like these on hand. It is a nice source of protein that gives you energy.

Ingredients

1 C unsalted cashew pieces
2 1/2 T cashew butter (you could use another nut butter)
1 pinch of salt
2 T chia * optional
1 T honey

Directions   makes 9

1. Pour all the ingredients into a bowl. Stir until all combined.
2. Form into balls with hands or with cookie dough scooper.
3. Place on cookie sheet lined with parchment paper. Chill in the fridge.
4. Store in airtight container in the fridge or freezer.

Wednesday, April 29, 2015

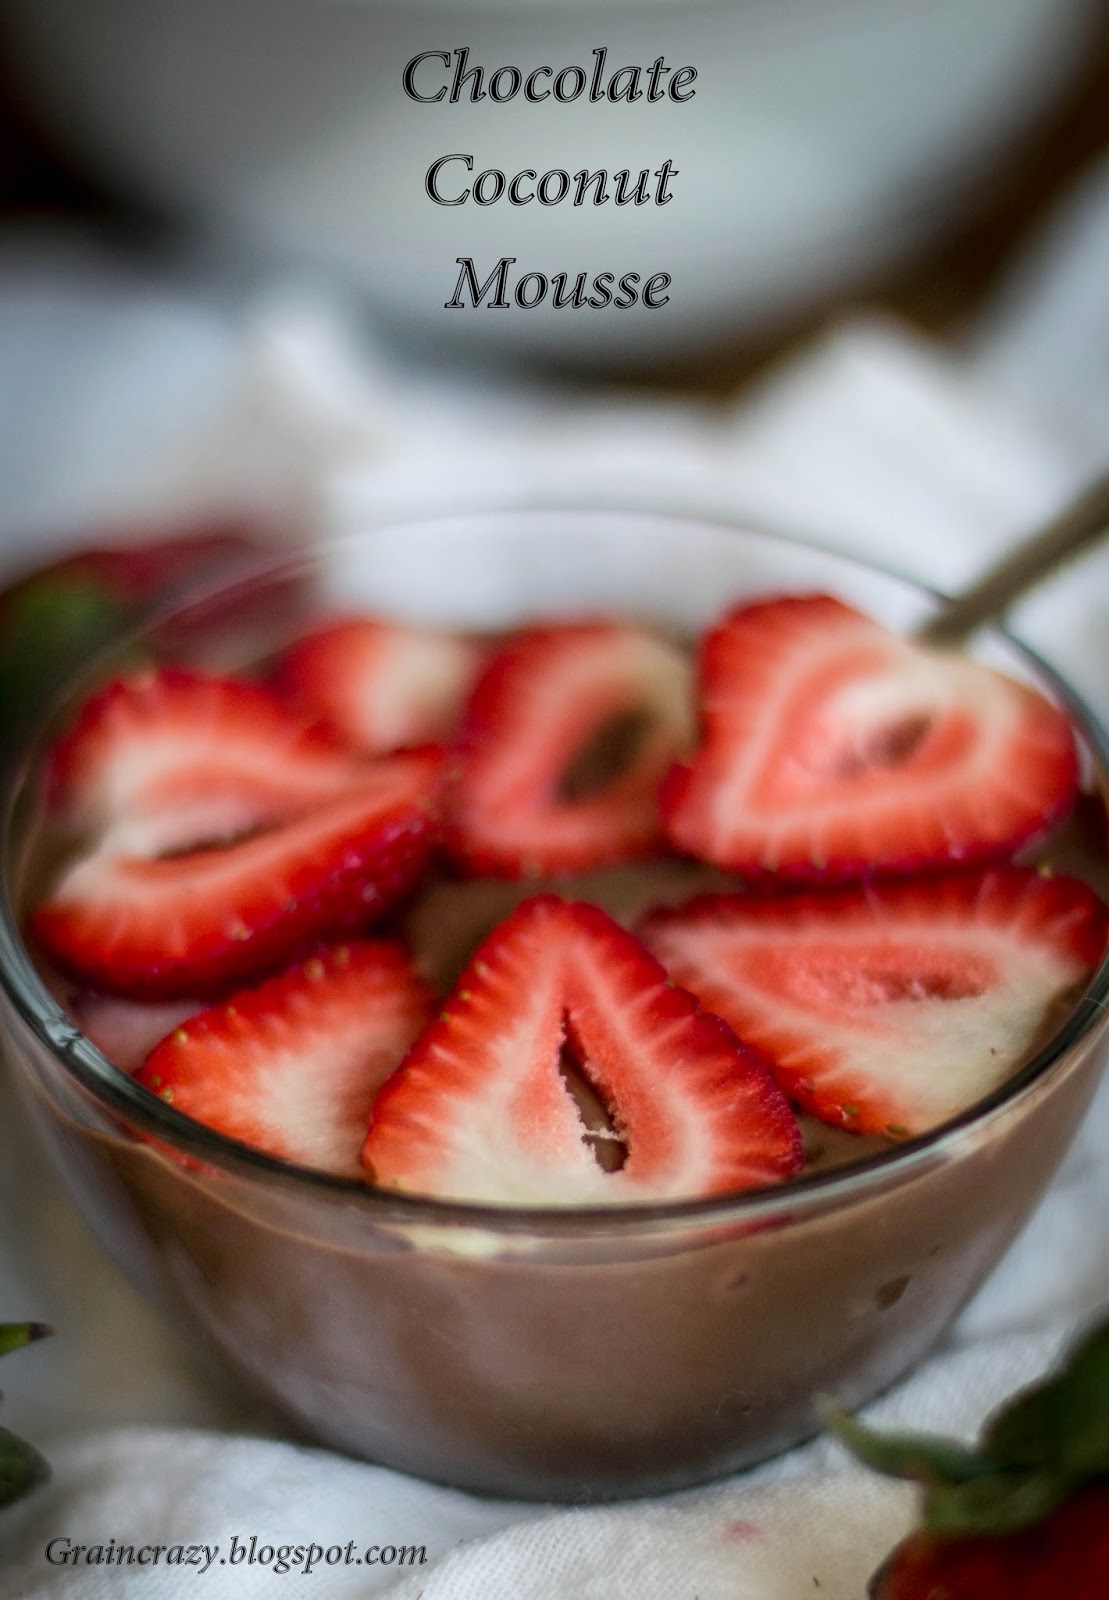
Chocolate Mousse (Dairy Free)


Isn't anticipation for happy things ahead the best. I am looking forward to seeing my new little granddaughter tomorrow. Such an amazing miracle to see these little ones come to earth. She is a lucky little girl to have 2 wonderful parents. I love being part of a great family that keeps on growing. :)

I made this the other day and it was smooth and creamy. It tasted really yummy with fresh strawberries. It is low in sugar and so fast and easy to make.

Ingredients
1 cup dark chocolate chips
2 tablespoons honey or vegan sweetener
1 cup canned coconut milk
Top with fresh fruit or your favorite topping.

Directions
1. Melt the chocolate chips and honey in a small saucepan over low heat, stirring frequently.

2. Take the chocolate chips off the heat and stir in the coconut milk. Chill in the refrigerator for 2 hours.

3. Serve. Store leftovers in airtight container in the fridge.


Friday, April 24, 2015

Teff Hot Cereal (gluten free)


Life continues to move along. We just got back from a trip to Florida. I have never been there before. We had a great time and enjoyed lots of water and sunshine. My favorite part was being with my husband. 

I continue to love having hot cereal for breakfast. It is fun to experiment and try new ones. This is a wonderful one loaded with nutrition. Look here to see some of the benefits to added Teff to your diet. This made a great breakfast. I get a wonderful satisfied feeling when I have a nice hot breakfast. It is a great way to start your day. I think I am going to make some for a snack. It is making me want some looking at the pictures. 

Here is something fun to watch to brighten up your weekend. Here cares about each one of us. 


Ingredients

1/2 C cashew milk or milk of your choosing
1 C water
1/2 T coconut oil
1 T honey or other sweetener 
1/2 C Bob's Red Mill Teff
1/2 tsp cinnamon
1/4 tsp nutmeg
1/2 C raisins optional
top with
additional milk

Directions   Serves 2

1. Put a medium saucepan pan on the stove and turn to medium heat. Pour in milk, water, oil and honey. Let it heat up a couple minutes.
2. Stir in the Teff until all combined. Stir in the cinnamon, nutmeg and raisins. Let the mixture come to a boil
3. Turn down the heat to medium low and cover. Let cook for 15 to 20 min. Stirring often. 
4. Pour into bowls and top with milk if desired. It warm. 

*You could make it the night before and store in an airtight container in the fridge and heat up in the morning. 

Monday, March 30, 2015

Lemon Chia Parfait


I have always loved lemon yogurt and have struggled with buying it because it has so much added sugar and additives. So I made my own homemade lemon parfait. It was so amazing smelling the lemon zest. I love that smell it almost as good as the food. The real lemon juice adds a nice flavor to it too. This was a winner.

Ingredients

1 C plain Greek yogurt
1 1/2 tsp fresh lemon juice
2 tsp lemon zest
1 T chia
1 tsp honey or more for sweeter version
garnish 
with lemon zest

Directions      serves 1

1. Put yogurt into the bowl and stir in juice, zest, chia and honey until creamy.
2. Garnish with more lemon zest and enjoy.


Thursday, March 26, 2015

Homemade Chia Lemonade (or slushie)


We had a wonderful day yesterday watching our daughter get married to a wonderful man. We are very excited to have him join our family. It was a beautiful day. "It's a wonderful life."

Oh Happy Day!

It is a regroup day putting things back together. I have been dreaming about making my own homemade lemonade. I finally took the time to do it today and it was good.

Ingredients

1 C water
7 T honey (more if you want it sweeter)
3/4 C fresh lemon juice
1/4 C chia
3 C Ice Cubes

Directions  Serves 2

1. In a saucepan heat water and honey together on medium heat until they are all combined. Then stir in the lemon juice.
2. Take off the stove and stir in the chia.
3. Pour into blender with ice and blend until combined. (If you want it slushie wait until the lemon mixture cools to add the ice.) Serve right away after blending.


Friday, February 27, 2015

Citrus Power Drink (Great way to fight a cold)


I 
I have been fighting a cold the past few days. I have been really enjoying a lot of citrus. I have found that when I drink citrus when I have a cold it tastes so good and breaks up the congestion. I made this today and it was so good. I was sad when it was all gone. Next time I will have to make a bigger batch. 

Ingredients

1 juice orange
1/2 lemon
3 clementines peeled
1 T chia
1 T honey
1 C water
1 C ice cubes

Directions
1. Squeeze the juice of orange and lemon into the blender. Throw in the clementines, chia, honey, water and ice. Blend until smooth. 
Enjoy! 


Tuesday, February 3, 2015

Whole Grain Oatmeal Rolls or Bread

After dough has risen

Whole Grain Oatmeal Bread

Yum!

It was fun making this bread. The taste of it reminded me of the bread that I love at the restaurants that has oatmeal on the outside of it. It was fun to find a whole grain bread that had the same flavor. I am guessing the the bread at the restaurant is not all whole grains. Its just a hunch. I will be making this again soon. :) It took a little time to make it, but the end result was worth it. :)

Ingredients:

1 1/2 C old fashioned oatmeal
1/2 C honey
2 T butter or coconut oil
1 1/2 C water boiling water
2 C warm water (about 110 Degrees)
3 1/2 tsp yeast
1 T honey
1/4 C chia * optional
2 eggs
6 1/2 to 7 C Whole Grain Four (I used 4 C wheat & 3 C Spelt )
1 T salt
1 1/2 C rolled oatmeal (for the outside of the loaf)

Directions:

1. In a metal bowl pour in oatmeal, honey and coconut oil or butter. Then pour over boiling water. Stir until all mixed then put aside and let cool till room temperature. (You could start the soaking process the night before and let it sit overnight in the fridge covered.)

2. In another bowl pour in water, yeast, honey, and chia. Stir until all combined. Let the mixture sit for 15-20 min. You should see bubbles in the mixture if yeast is active.

3. Pour both the oatmeal mixture and yeast mixture into bosh or mixer with bread hook. Add the eggs and mix until all combined. Add the salt and 1 C of flour at a time until combined. (If you dont have a bread mixer you could stir all mixtures in a bowl until combined. Then pour onto floured or oiled surface and knead until a smooth consistency. 

4. Let the Bread mixer go for 3 to 4 min. Until the dough pulls away from the bowl. (But don't let it get too dry. The dough should be sticky) Let the dough rest for 10 min. Then turn on the mixer and let knead 2 more min. (With hands that have a little oil on for easier handling)

5. Then place dough in bowl that has oil on sides. Rise dough until doubles in size. Rub dough on top with oil. Cover the dough with plastic and let rise till doubles in size. (You then can deflate the dough by punching it down, and let double one more time or proceed to putting it in the greased pans. Extra rising time results in a slightly lighter bread)

6. Punch down the dough after rising process is complete. Divide the dough in half. Roll into a loaf. Pour 3/4 C of the oatmeal on to a rectangle piece of parchment paper. Spread the dry oatmeal in a rectangle, and then roll the  dough on to the dry oatmeal on all the sides.

7.  For bread place in  2 greased bread pan. (9x5x3) Cover with plastic. Again let it double till it is 1 inch over the bread pan. 

8. For rolls form into balls and then roll the rolls into dry oatmeal that is on the wax paper or parchment paper. 

7. Heat the oven to 400.

8. Bake for about 45 min. Till the internal temperature is 200 degrees. Should be a nice golden brown when all done.


9. Rub the bread or rolls with butter if desired, it keeps the crust soft. Place the bread on it's side (Keeps the loaf from falling) on a wire rack to cool. If it lasts that long. We love to eat it when it is warm.

Tuesday, January 27, 2015

Almond Butter


My daughter had car trouble last night and stalled in the middle of the road. It warmed my heart to have to men come and push it and help her to start it again. There are angels among us. There are good people everywhere that are there to help in our time of need. It makes me very grateful to live in this beautiful world.

I love almond butter. It is a fun treat for me. It is fun when I make it at home. It is easy to make and tastes great. Almond butter can be used on the same things you would use peanut butter for. Enjoy!

Ingredients

1 C almonds
1 1/2 T chia
1 T honey (vegan version use maple syrup)
1 T coconut oil

Directions

1. Pour all the ingredients into the blender or food processor. Blend and pulse until smooth. Serve at once.
2.  Store in airtight container in the fridge.

* I recently got the twister job from Blendtec. It worked so great when I was making this. I love it.


Saturday, December 6, 2014

Peanut Butter Fudge (Low sugar)


This is super easy fudge. There are only 4 ingredients.  It is also low in sugar. It tastes creamy and delicious. You will love it. Great treat for the holidays. Who can resist chocolate and peanut butter.  Happy Holidays.

Ingredients

1 C dark chocolate chips
2 T coconut oil
1 T honey for vegan add maple syrup
2 T natural peanut butter

Directions  made about 8 pieces

1. Place chips and oil in a bowl and place in microwave and let them cook until they are all melted. Don't over cook. It took about a minute.
2. Take out of the microwave and stir in honey and peanut butter while it is still hot. Stir until all creamy and smooth.
3. Pour into a greased container. I used a small load pan. That is about 5 3/4 long and 3 1/4 inch wide.
4. Place pan in the fridge. It hardened in about 30 min. Cut into small bite size pieces.
5. Store leftovers in airtight container in the fridge. Yum!
* Double the recipe if you want to make more.


Friday, November 7, 2014

Chocolate Chip Peanut Butter Dough Bites (gluten free)


I sometimes get cravings to eat cookie dough. This is a great way to satisfy that craving with out all the calories. You can make them up ahead of time and then you will have them ready when the craving hits. They are also a great high protein snack. Enjoy!


Ingredients


1/3 C natural peanut butter
1/4 C honey
3 T coconut oil
1 tsp vanilla
1 C Old fashioned oatmeal
3/4 C unsweetened shredded coconut
1/3 C chopped up dark chocolate chips
1/3 C chia  ground*optional


Directions  makes 15 bites

1. In a mixing bowl put peanut butter, honey, oil and vanilla. Stir together until all creamy.
1. Add the rest of the ingredients into the bowl. Stir until all combined or use your cleans hands to help all of the ingredients combine together.
2. Roll into balls with your hands. Put on a non stick surface.
3. Then place in the fridge to harden. After they harden put in airtight container and store in fridge or freezer. Enjoy!


Friday, October 31, 2014

Chia Fresca Drink (protein drink)

My daughter thinks it is fun to buy the chia drinks from the store. You know you can make your own and down on the sugar and control what is put in it? Here is a fast and easy recipe. That tastes really good. Great way to boost up your energy for the day.


Ingredients

1 C unsweetened pure juice (I used pomegranate cranberry)
3 C water
3 T chia
3-4 T honey
juice from one lime
quart jar with a lid

Directions

1. Pour all ingredients into a quart jar and shake it up. Leave in the fridge for at least 30 min to let the chia soften and expand. A great drink to enjoy all day long.


Friday, October 17, 2014

Chewy Protein Energy Bars

I loved this picture of my daughter throwing up the leaves yesterday. She was an angel. She came and raked up and bagged 10 bags of leaves and carted them away. We have wonderful children who bless our lives in so many ways. I have loved the times my children and grandchildren have enjoyed playing in our leaves. There are a lot more leaves to come. The trees still have a lot of leaves on them. :) The raking and bagging is not over.


It is easy to find a lot of energy bars in the store. They are often very expensive and a lot a times you need a dictionary to decipher what the ingredient its. The safest bet and healthiest is to make your own ahead of time. Then you know exactly what you are eating.  The key is to make up a batch of them ahead of time and then you will have them ready to go when you need them.


These are loaded with protein. They are low in sweetener and taste great. You can make them your own by being creative and adding your favorite dried fruit or you can leave it out. I left it out this time.  I loved the soft chewiness of these bars. They also had just the right amount of sweetness.  Have a great weekend.


Ingredients

1/2 C chia ground *
1 C Old fashioned oatmeal
1/2 C sunflower seeds
1/4 C whole grain flour (I used spelt)
1/2 C dried fruit of your choosing * optional
1/2 C raw almonds
1/2 C raisins
1/2 C soft dates
1 tsp cinnamon
2 T coconut oil
5 T honey
2 eggs


Directions  Heat oven to 350

1. In a blender or food processor, pulse and blend everything except oil.  honey and eggs. Blend until all broken down.
2. Pour in bowl add oil, honey and eggs. Blend until all combined. I used a wire whisk to get it all to blend together. It will be a thick paste.
3. Grease a 9x9 pan (I love the way stone ware cooks.) Grease pan or line with parchment paper.
4. Place in oven and bake about 15 min or until done.
5. Take out of oven and let cool about 15 min before cutting.
6. Store wrapped up in air tight container individually so they are ready to grab. You can store in the fridge for 3 days or freeze them up to 3 months.

* I ground up chia ahead of time in a small grinder.

Wednesday, October 15, 2014

Clean Eating Caramel Dip (Low Sugar and Dairy Free)


I love this clean eating version of caramel. I was looking up a caramel recipe that had corn syrup, sugar, butter and whipping cream in it. My guess is this one tastes just as good and is so much healthier for you. This cooked up in 15 min. so fast and easy. You can enjoy this on apples or anything that you enjoy dipping caramel into. Great treat for a gathering. You could also dip whole apples into it for caramel apples. I added a little to my oatmeal this morning. Yum! Here is a recipe for Caramel Apple Quinoa. 

Ingredients

1 C canned coconut milk (full fat)
5 T honey or sweetener of your choice.
2 T coconut oil
1 tsp vanilla

Directions

1. In a small sauce pan on medium heat. Pour in milk, honey, and oil.
2. I turned up my setting on my stove up to 6. I stayed stirring it the whole time. Not wanting it to burn. Keep stirring. It took mine about 15 min to thicken.
3. Take off the heat and stir in the vanilla. It will thicken as it cools. Enjoy a wonderful treat!
4. Store leftovers in the fridge in air tight container. When ready to eat warm up on stove or in microwave. It will harden in the fridge.


*I loved the idea of dipping the apples in lemon water to keep them from turning brown. I also leaned this week you can put a little honey in water and put the apples in it for a few minutes and they won't turn brown when you take them out.


Wednesday, October 8, 2014

Peanut Butter and Jam Sandwich Bars


These are a fun tasty snack. They could also be a fun thing to eat for lunch in place of a sandwich. It is a yummy combination of flavors your will love. I love eating peanut butter and jam together on toast. If you love peanut butter and jam sandwiches you will love these. My grandchildren will love them too.


Ingredients

1 C old fashioned oatmeal
1 C spelt flour or whole grain flour
1 tsp baking powder
1/2 C coconut oil
1/2 C honey
1 C creamy peanut butter (natural)
1 tsp vanilla
2 eggs
1 C fruit only (no sugar) jam  flavor of your choice

Directions

1. In a small bowl mix together oatmeal, flour, and baking powder. Set the bowl aside.
2. In a medium bowl beat together oil, honey, and peanut butter. Then beat in vanilla.
3. Beat in eggs one at a time. The mixture should be smooth and creamy.
4. Beat or stir in the dry ingredients into the peanut butter mixture until all combined.
5. In an 8 X 8 square pan Scoop in half of the dough. Smooth out on to the bottom of the pan.
6. Then drop spoonfuls of the jam on top of the dough in the pan and smooth out with the back of a spoon or a spatula.
7. Drop the remaining dough on top of the jam. In spoonfuls all over. Then spread gently with a butter knife or spatula. Try not to disturb the jam too much.
8. Place in heated oven. Cooking time 20-25 min. or until golden colored. Take out of the oven and let cool for 10 min. It gives the jam a chance to thicken up.
9. Cut into squares and serve. Store leftovers in air tight container.


Tuesday, September 2, 2014

Pumpkin Pudding with Candied Pecans (Low sugar & Dairy Free)


 I love this time of year when I start making more pumpkin dishes. I love to eat pumpkin all year long but, I it especially fun when the leaves start changing Fall is here. I noticed some beautiful red leaves as we drove home from our annual Labor Day weekend at the lake. I love being with my family enjoying beautiful scenery and warm water.

This pudding whips up fast and is low in sugar. You will love its wonderful creamy texture. This would be great to serve for the Fall holidays coming up. Enjoy!

Ingredients

4 T honey or  4 T vegan sweetener
2 T cornstarch
1 3/4 C almond milk
1 egg
1/2 C unsweetened pumpkin puree
1 tsp vanilla
1/2 tsp cinnamon
1/4 tsp nutmeg
1 T honey or vegan 1 T sweetener
1/2 C chopped pecans

Directions     Serves 4

1. In medium sauce pan (off the heat) stir honey and cornstarch together until all combined.
2. In a small bowl beat together milk and egg.
3. Place saucepan on medium heat with honey mixture in it. Start stirring. Stir in the milk mixture slowly.
4. Let the mixture come to a boil stirring constantly. Let boil for 1 minute. Turn down the heat to low and let it cook stirring constantly 1 to 2 min.
5. Take off the heat and stir in pumpkin, vanilla and spices.
6. Pour into serving dishes and cover with plastic and let chill.
7. In the meantime put nuts and honey in a small skillet and place on medium-low heat. Stir and let them toast for about 5 min. The honey will nicely thicken. Take off the heat and let cool. Put in small bowl.
8. Garnish chilled pudding with nuts and serve. Yum!

Monday, June 30, 2014

Raw Brownie Bites


These are a healthy version of brownies that you get from a box. You can have them ready in the fridge when you get that craving. They are easy to make and taste great! Brownies with out the guilt. 
Ingredients

1/4 C almond milk
3 T chia *optional (So good for you)
2 1/2 T cocoa powder
1 T honey
1 T coconut oil
1 tsp vanilla
1/2 C cashew butter or almond butter (make your own)
1/4 C chopped up cashews

Directions

1. In a blender blend the milk and chia together to break down the chia.
2. Then add the cocoa, honey, oil, vanilla and butter. Blend and stir until all combined.
The mixture will be sticky. Place the mixture in the fridge about 30 min or less until it thickens up.
3. Grease hands with oil.
4. Place chopped nuts on a plate.
5. Roll into small balls (makes about 8). Then roll into nuts.
6. Eat or store in air tight container in the fridge. Enjoy!

Friday, June 27, 2014

Cashew Coconut Cookie Dough Bites (Gluten Free)


I was visiting with my friend Sue today. She just got home from Hawaii a couple days ago. (Love Hawaii) She was sharing some coconut vanilla cashews with me. They were yummy. So I got inspired to make this recipe after tasting her nuts. The great thing is these are much healthier, but you get a similar flavor. So yummy and good. So fast and easy to make. A great little snack. Have a wonderful weekend.


Ingredients

1C cashews
1 C unsweetened coconut shredded
1 C old fashioned oatmeal
1/4 C honey
1 tsp vanilla
1/4 C dark chocolate chips * optional

Directions makes about 12

1. In a blender or food processor blend cashews and coconut until combined and broken down.

2. Set aside 1/2 C of the mixture and then pour in everything else in to the blender except the chips. Blend until all combined.

3. Fold in the chips. Roll into small bite size balls.

4. Roll the balls into the 1/2 C mixture you set aside. Place on a plate or into a covered container. Let them harden in the fridge and enjoy.

5. Let overs should be stored in the fridge in a covered container.


Thursday, June 19, 2014

Mango Cake Bites (Raw)


I thought it would be fun to make some little bites out of mangoes. It is a fun little bite size snack that is great anytime of the day. I am a big fan of mangoes so I love adding them to things I make. Mangoes have such  a wonderful flavor and it adds to the recipe that I add them to.


Ingredients

1/2 C water
1 C frozen mangoes chopped up
3/4 C cashews
1/4 C quinoa flour
3/4 C unsweetened coconut
2-3 T honey
3 T coconut oil
unsweetened coconut to roll them in

Directions

1. Pour ingredients into the blender or food processor starting with water and mangoes.
2. Blend until smooth and creamy.
3. Then add the remaining ingredients and pulse and stir until all smooth.
4. Put in the freezer or fridge until it starts to harden.
5. Roll into small balls. Then roll into coconut that is in a small bowl or plate.
6. Place back in fridge or freezer depending how hard you want them. Allow time for them to harden. 7. Store in an airtight container. Eat  and enjoy!


Thursday, April 17, 2014

Almond Joy Bites


The words from this song rang through my head as I was making these was "Sometimes you feel like a nut sometimes you don't... Almond joy got nuts Mounds don't..." I have always enjoyed Mounds and Almond Joys. This is yummy way to enjoy them without so much sugar and additives. I don't think you sacrifice in flavor they are delicious. You can even eat them without the chocolate on them. They taste great with or without the chocolate. These are for the time "you feel like a nut." :) I love getting nuts in every bite too. 

This treat is a great alternative to the Easter candy you can buy at the store. Make them and then you will have them on hand when you want a yummy healthy treat. :)


Ingredients
1 C of plain almonds chopped fine
1 C unsweetened shredded coconut
2 T honey or vegan sweetener
3 T coconut oil
1/2 tsp vanilla
1/8 tsp salt *optional
1/3 C dark chocolate chips
2 tsp coconut oil

Directions makes about 12
1. In a medium sized bowl mix together almonds, coconut, honey, oil, vanilla, and *salt.
Stir together until it is all combined.
2. You could put in the fridge for 10 min to let the mixture harden a little, or just form the mixture into small balls. I made 12 of them.
3. Place them in the fridge in a covered container.
4. If you want chocolate on them melt the chips and oil in the microwave or stove on low until all melted.
5. Take the bites out of the fridge and roll in the chocolate. Place them back in the fridge in a greased covered container. The chocolate will harden quickly, and they will be ready to enjoy!
6. Keep the stored in the fridge to keep them hard in an airtight container.

*Another yummy one Raw Coconut Almond Cocoa Bites
*Also chocolate covered peanut butter oatmeal bites.